
This blog includes everything you need to know about getting self-contained certified in New Zealand including the specific requirements and how to meet them. If you are planning on doing a campervan conversion, then reading this blog first is essential!
Converting a vehicle into a livable campervan or motorhome is an exciting journey, however, there are a few things that can make it stressful. In New Zealand, one of those things is a self-contained certificate. With this certificate, you have to option to camp in thousands of places across New Zealand completely free!
But without it, freedom camping becomes a lot more difficult and you risk getting a hefty fine.
But getting your campervan in New Zealand certified self-contained can be challenging and downright confusing.
After getting my own campervan the self-contained certification, I realized it didn’t have to be this way, and instead it was actually quite easy once it was explained to me properly.
So in this post, I will outline all the things you need to do in order to get self-contained certified in New Zealand, in a few simple and easy steps!
Note: this guide was written for the intended use of small van conversions (not larger fixed tank conversions.) It is also in accordance with the New Zealand self-contained certification standards NZS 5465:2001, so be sure to check your local council’s requirements (if any) before starting your campervan conversion!
FAQs about Self Contained Campers in New Zealand
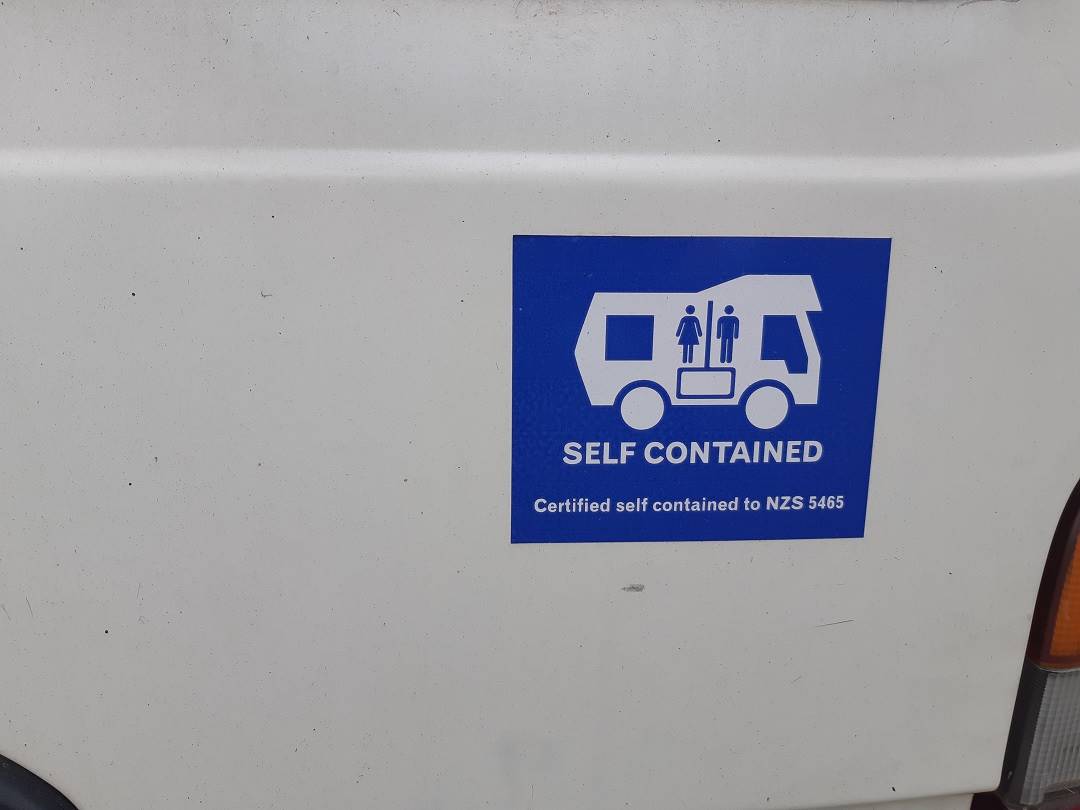
What is a Self-Contained Certification in New Zealand?
A self-contained certificate in New Zealand is a license that certifies that your campervan or motorhome can be self-sufficient for up to 3 days. This means dealing with all types of waste and providing ample fresh water.
In order to get this certificate though, you must meet a detailed list of requirements and pass a thorough inspection.
All of the requirements of a self-contained vehicle are based around those two rules and these both protect the environment and the user.
Who Issues the Self-Contained certification?
Around New Zealand, there are individuals and companies that inspect campervans and issue self-contained certificates to them. They are usually plumbers.
In some areas of New Zealand (such as Queenstown,) there are no local inspectors and you will have to travel to find one. However, in areas such as Auckland, testing officers they can be found very easily.
You can find a list of self-contained testing officers for the South Island here and North island here!
Related Read: If you haven’t purchased your campervan yet here is all the information you need before you buy a campervan in New Zealand.
Self-Contained Requirements in New Zealand
Below are the self-contained requirements in New Zealand put in simple terms. There is a huge book that inspectors use that outlines the rules, but I have summarized the main points below.
Important Note:
When you go to get your van inspected for self-contained certification, you must declare how many people can live in the van. This is important because it changes the amount of freshwater and the size of waste tanks you need. Most people build a campervan to house only two people.
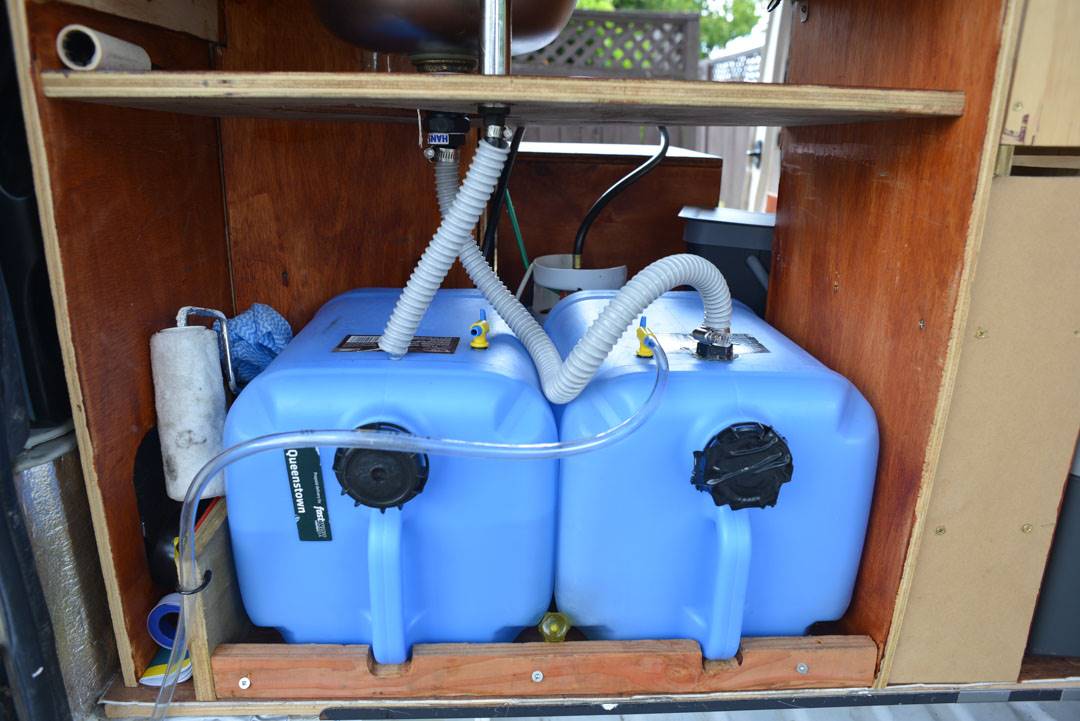
Fresh Water Tank
You must carry 12 liters (3.2 gallons) of fresh water per person (4 liters (1 gallon) per day for 3 days) if you plan to get your campervan self-contained. This means that for two people you need 24L (6 gallons), or for 3 people, 36L (10 gallons).
This tank must be opaque and made of non-toxic material. Most tanks intended to hold drinking water will meet this requirement.
The inlet (lid on portable tanks) must be no smaller than 25mm in diameter (0.98in), unless it is pressure fed, then 12mm (.47in) is fine.
Grey Water Tank
The grey water tank will be connected to the sink in your van and sealed so it doesn’t leak. You need to be able to carry 12L (3 gallons) per person (the same as the freshwater.)
This tank needs a vent (mentioned in detail below) that must rise from the grey water tank up to the sink and terminate outside the van. I used a hole in the step of my van for this but you may need to drill one. Please do not drill through the side of your van.
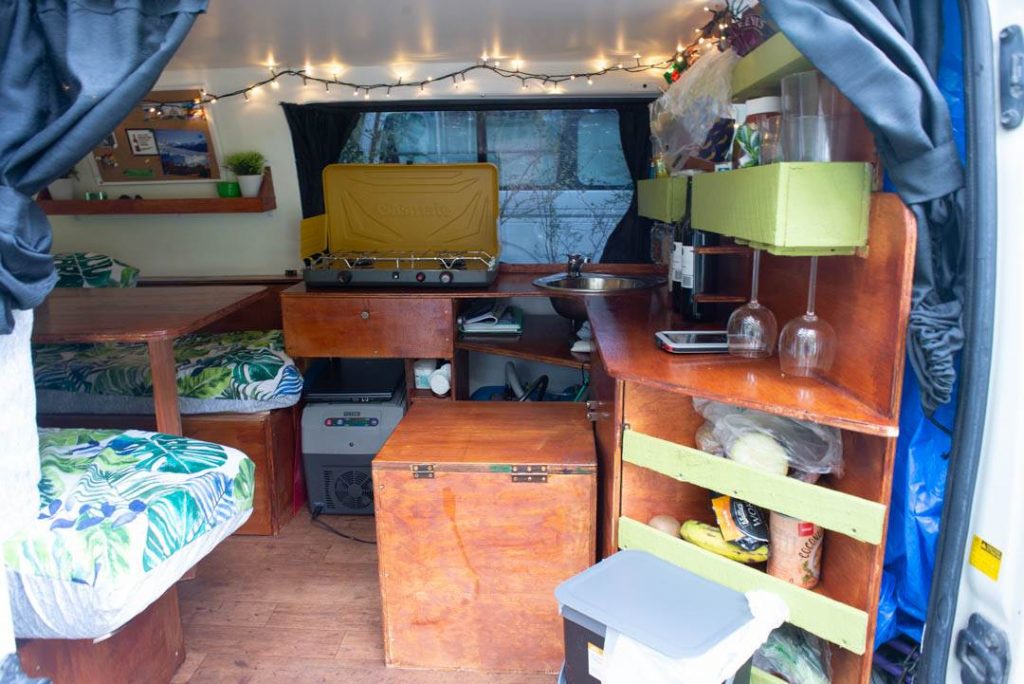
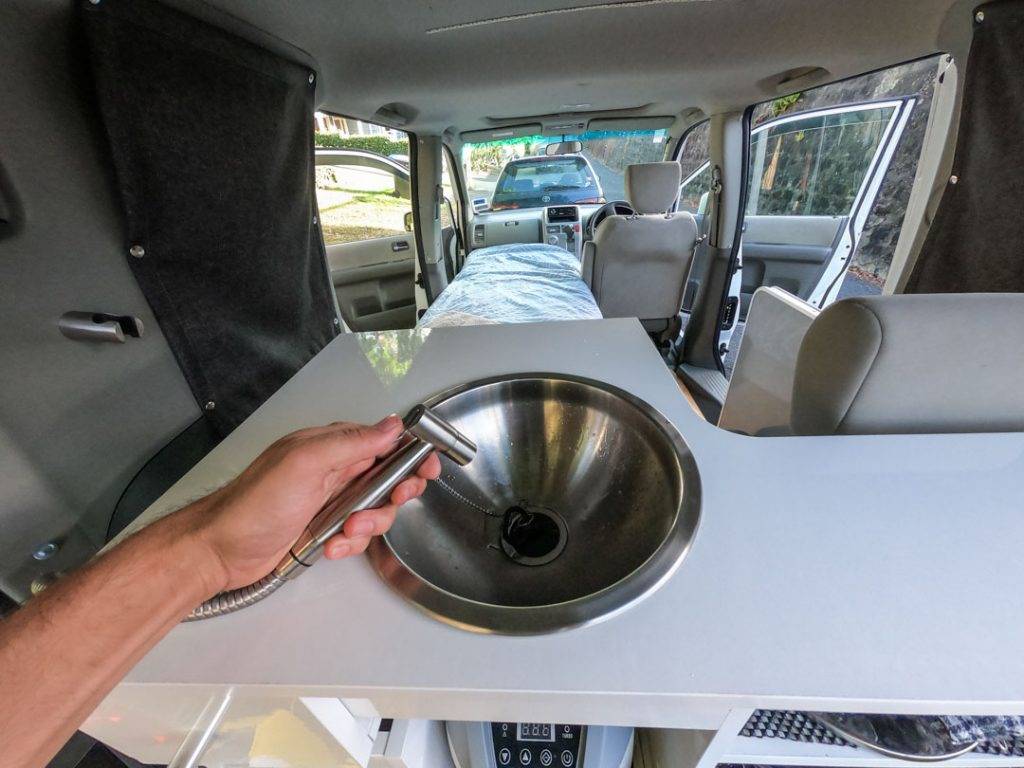
Sink
You must have a sink connected to your grey water tank via a trap. The trap can simply be a loop in the hose to trap water.
The sink also needs a tap that is connected to your freshwater tank. This can either be a pump tap or an electric tap
Vents
All of the water tanks must have vents. These vents allow air to flow in and out of the tanks when water is being taken out or drained to allow water movement easily.
Evacuation hose
If you have a fixed tank, your evacuation hose needs to be 3m (9.8ft). If your tanks can be removed then this is not important as you can simply remove your tanks and pour the waste out.
Online it does say that even if your tank is portable you need this hose, however, during my certification, this wasn’t even brought up.
Rubbish bin with a lid
You need to have a rubbish bin (garbage can.) There is no size requirement for this.
The rubbish bin does need to be fixed to the vehicle to prevent the garbage from flying all over the place when you are in motion. A simple strap to hold the bin in place and upright will do the trick! The bin must also have a lid.
Toilet
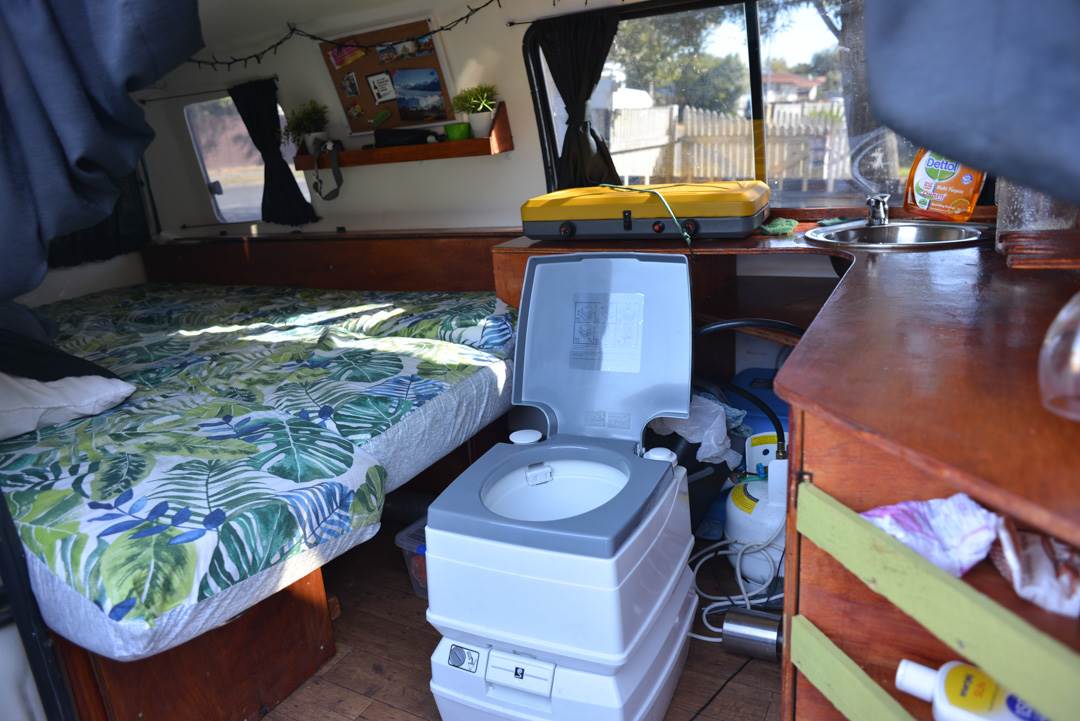
A fixed or portable toilet is required and must have 3L (3qt) of waste storage per person. The new rules state that you must be able to use the toilet with the bed down and have some elbow room.
Related Read: If you’re looking to hire a mortorhome in New Zealand here are the best companies and what you should know before you go.
Steps to Hooking Up Your Sink for Self-Contained Certification
Step 1: Secure your sink and fresh/grey water tanks
Part of the requirements for getting self-contained in New Zealand is having your tanks securely fitted so they don’t move around while driving and having a fixed sink.
If you have a fresh and grey water fixed tank that can’t be removed then this isn’t an issue, however, if you plan to use portable tanks then you must have a way of temporarily fixing the tanks while you’re in your campervan.
I did this in my campervan by building a wooden frame around the sides and using elastic straps. However, there are no set rules to this and you can do this however you want.
The sink must be permanently installed. I did this by cutting a hole in my kitchen bench (countertop) and gluing it in.
Step 2: Hook up the grey water tank to the sink
For your grey water tank, you will need to run a waste pipe from the bottom of the sink to the grey water tank. This must be watertight and must have a water trap.
The rules around the size of the hose state that it must be no smaller than 18mm (.7in) if the hose is less than 3m (9.84), and 25mm (.98in) if it’s over 3m (9.84). For my setup, I only needed an 18mm (.7in) hose.
To connect the waste pipe to the grey water tank I drilled a hole in the tank and then glued in a plastic fitting that the hose could be hose clamped to.
The tank must also have a vent no smaller than 12mm (.47in) in diameter that is connected to a hose that terminates outside the vehicle. This hose must travel higher than the waterline of the sink before exiting the vehicle. The below diagram explains this.
I bought my vents from Burnesco and they cost me $12 ($12.99 in 2022) each. These vents require you to simply drill a hole in your tank and push them in.
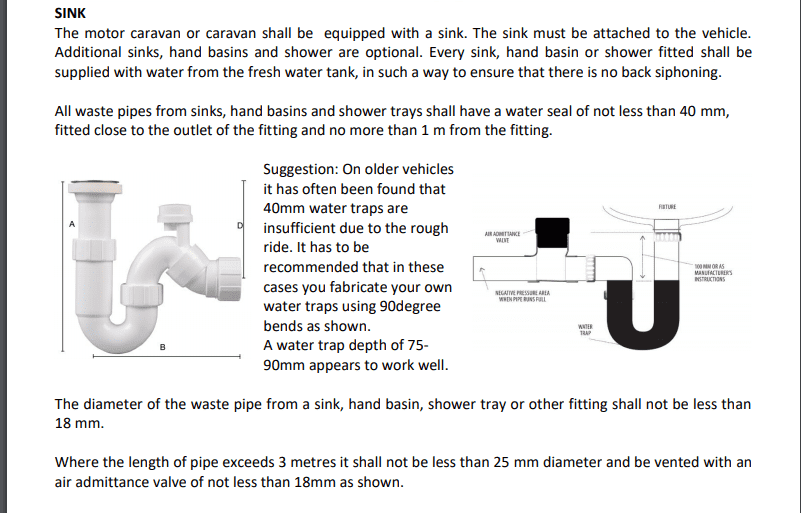
Step 3: Hook up freshwater
To hook up the fresh water tap you need to buy a hose that will connect to the fitting on your tap. Once you have this hose, drill a hole the same size in your freshwater tank. Then, run your hose from the bottom of the tank through the hole you drilled and up to the tap. You should be able to use hose clamps to connect this part to the tap.
In your freshwater tank, you should also have a vent. Install this the same way as the greywater vent but you do not need the extra hose connected to the vent to exit the vehicle.
Important Guidelines about Getting Self-Contained in New Zealand
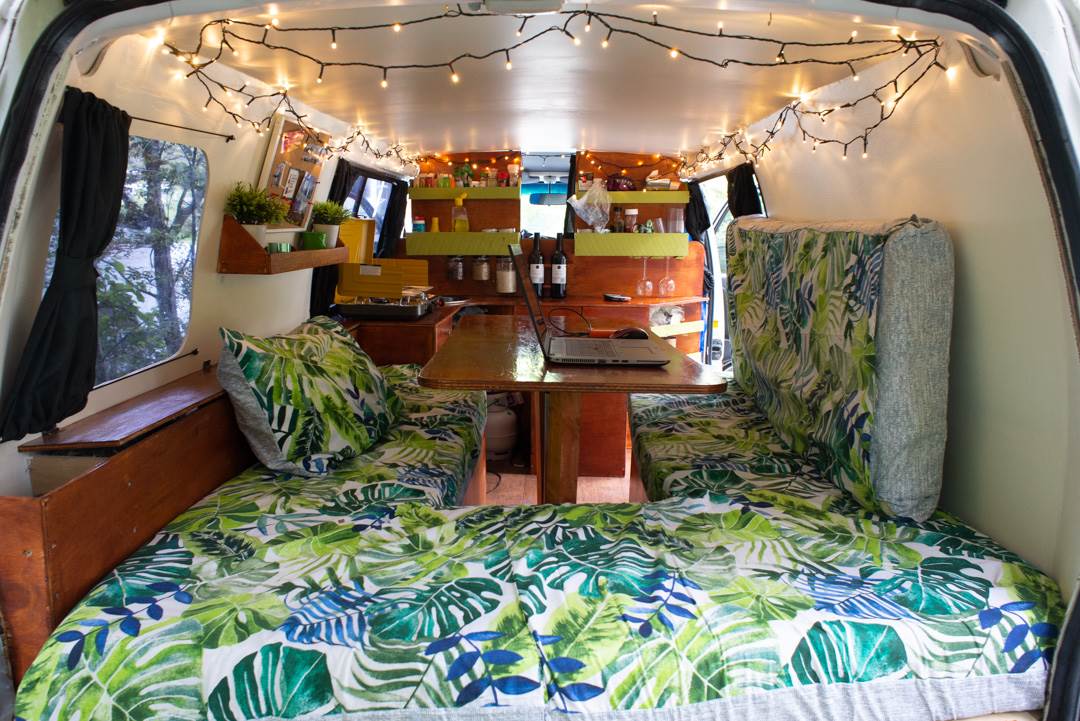
One of the most helpful guides I found on the internet was this APCNZ guideline book for getting self-contained. If you are specifically converting a small van (like I was) then you can read the whole book, but page 14 is the most specific to the smaller van conversions.
Another helpful guide is this New Zealand government regulation handbook. This is the same as the guide above, however, I found it is written in a more confusing way.
Where to Buy Your Equipment?
Bunnings or Mitre 10 – These hardware stores are great for most of your hoses, glues, hose clamps, and fittings. However, I could not get the food-grade hose from them.
Burnsco – These guys are motorhome hardware suppliers in New Zealand. They have the right size vents and food-grade hoses for your fresh water. I also got my sink and pump tap from them. If there is a Burnsco near you go see them and they can help you out a lot when it comes to getting certified. Otherwise, you can order things online and get them shipped right to you!
Repco – I got my water tanks from them. I only used them as I was in Queenstown and they were delivered for free to my house. You could, of course, get these tanks at Burnsco or Bunnings too.
Related Read: What’s it really like living in a van? Here’s the pros and cons about vanlife.
Cost of Equipment and Self-Contained Certification in NZ
Certificate – This cost me $150 but you can get it much cheaper. I was in Wanaka and there is only one guy who does it there, so he charges what he wants.
Tanks – The tanks were $25 each, so $50 total. ($60 for one 25L tank in 2022)
Vents – $12.50 each, so $25 total. ($13 in 2022)
Pump tap – $60 ($70-$75 in 2022)
Sink – $100, you could get this much cheaper if you find one secondhand. ($80-$250 new in 2022)
Hose clamps and fittings – $20
Toilet – $40 as I got my second hand. They are around $110 brand new
Rubbish Bin – $6 from Kmart
Tools to remove tanks for dumping – $5. I bought a flat head screwdriver for the hose clamps
Straps to hold tanks in place – $5
Total = $461 (around $520 in 2022)
Keep in mind that fully converting my van costs much more than the price above after adding in the cost of wood, accessories, and extras (such as a second battery.) For a full list of how much converting my van cost, check out my guide to DIY Campervan Conversion!
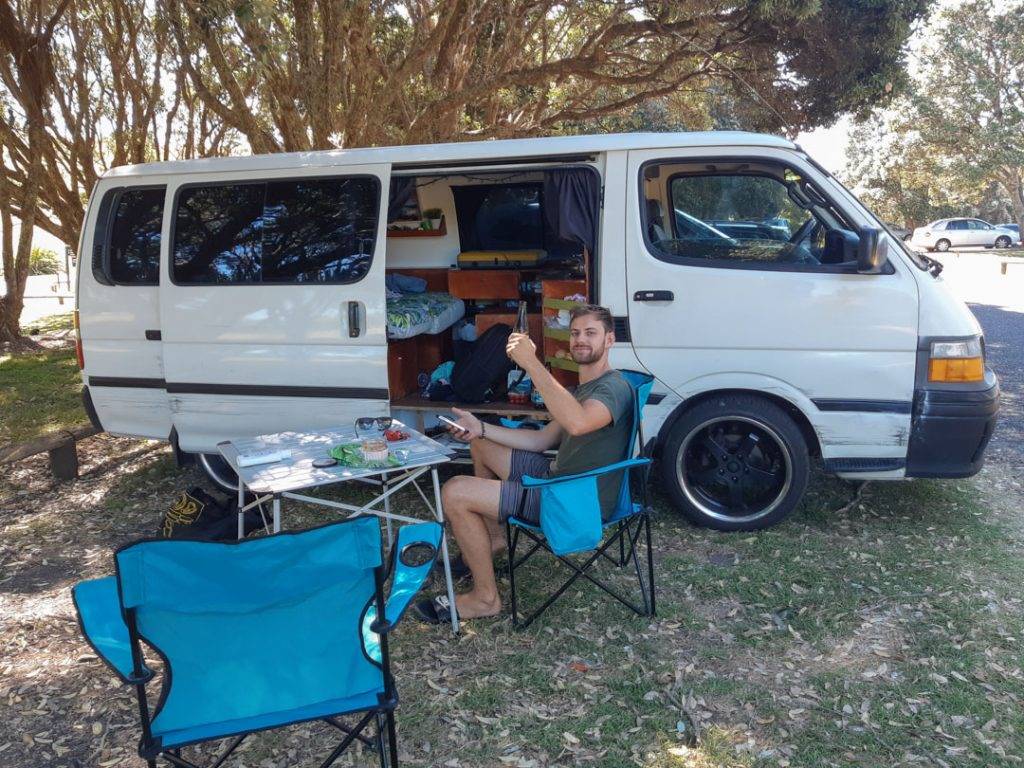
Renting a Car or Campervan in New Zealand

The first step to planning your New Zealand road trip is choosing your set of wheels! Most people rent a campervan or motorhome to get around, but you can also just rent a normal car and stay in hotels (as opposed to camping). To help you choose, we’ve outlined our favorite rental companies below (along with some great discounts!).
Car
If you plan on renting a car, we highly recommend Snap Rentals. They are a local company that offers affordable and high-quality rental vehicles across the country. Plus, if you book through this link or use our exclusive code DT10 at checkout, you’ll get 10% off your rental!
If Snap Rentals doesn’t have what you need, you can also search for rental cars with Discover Cars to compare car models and prices across a variety of companies. We’ve used this website all over the world, and you can read our honest review of Discover Cars here for more details!
Campervan
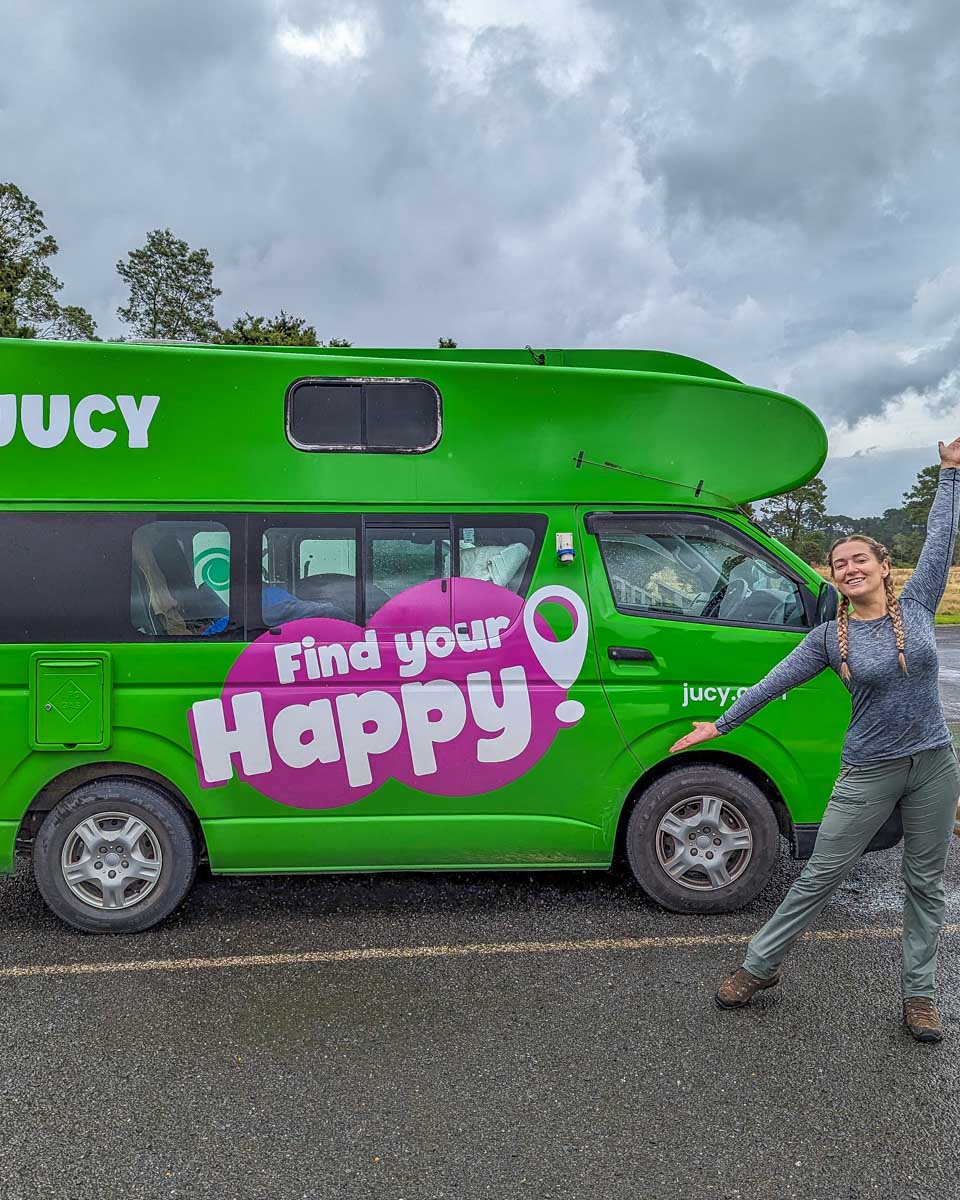
JUCY is our personal favorite campervan rental company in NZ. We love JUCY because they have such a range of both cars and campervans available, so you’re pretty much guaranteed to find something to suit your budget and travel style.
We’ve actually secured an exclusive discount code for our readers with JUCY. Just click here to browse their availability and use the code DTRAVEL10 at checkout to get 10% off bookings made through June 30, 2026, for travel between May 1 and June 30, 2026 (minimum 5-day hire). And if you’re traveling outside those dates, you can always use the code DTRAVEL25 at checkout to get 5% off bookings made anytime. What a good deal!
Motorhome
Star RV is another company we personally recommend, but specifically for motorhomes! They offer larger motorhomes (as opposed to budget campervans) at really reasonable rates. Star RV has actually given us a discount code for our readers, too! Use the code DTRAVEL10 at checkout to get 10% off motorhome rentals booked through June 30, 2026, for travel between May 1 and June 30, 2026 (minimum 5-day hire). Not traveling during those dates? You can still enjoy 5% off with code DTRAVEL25 on rentals anytime. Click here to browse availability, prices, and book with our discount code!
If JUCY or Star RV don’t have what you’re looking for, check out Motorhome Republic. It shows all of the available campervans and motorhomes for your specific New Zealand road trip dates, making it easy to compare prices and features.
Thanks for reading!
Getting my van self-contained was a big hassle and my goal for this post is to make it easy for others. If there is something you don’t understand or need help with, just leave a comment below and I’ll help you the best I can.
Let’s be honest, making your own self-contained campervan in NZ is a lot of work! If you decide to rent one instead, check out our guide to campervan rental in NZ to help you decide on what exactly you need!
If you would like more information on building or converting a van into a campervan check out all of our blogs about vanlife! And, if you plan on traveling in New Zealand, we have written a ton of blogs that include useful info on the things to do in NZ including road trip itineraries, the best places to visit, and more below:
10 Tips for Scoring a CHEAP Campervan in New Zealand
Essential Tips for Buying a Campervan in New Zealand
10 Awesome Road Trip Itineraries in New Zealand


Hi Daniel !
Thank you so much for all this infos !
However I have two questions for you.
– Do both of the water tanks need a vent ?
– Do they HAVE TO connect to the outside of the vehicle ? If yes do I need to just drill a hole in my van to fit the vent pipe in ? I’m a bit lost there..
Thanks a lot
Hey!
Yes, both tanks need a vent. This is to allow for the airflow needed when pumping water in and out of tanks!
Yes, but only the grey water tank vent needs to be connected to the outside of the van. In my opinion, this is silly but it is required. If you are going to drill a hole try to find a spot in the step of the van at the door. Do not drill through the side of the van. In my Toyota Hiace, there was a hole that was already in the step from the factory which made mine easy. What kind of van do you have?
For reference check out the photo in the blog of the two water tanks. You can see the right tank (grey water) has a vent and hose that travels down towards the step of the van. Just note that I didn’t run my hose higher than the sink like your suppose to but was let off by the self-containment officer.
After reading the blog back through I can see how it’s confusing. I think I will edit the post the make it clear.
If you have any more questions let me know!
Hi,
I have just stumbled across this blog and note there is one error regarding the grey waste vent.
It must rise above the bottom of the sink before exiting the vehicle.
I am an SCO so I know this to be true. I see so many who have followed similar setups as this and have to fail them because of this simple mistake.
Hey Peter!
Thanks, I do remember this but missed it in the blog! I’ll be sure to add it now!
Thanks’
Daniels
@Peter Boyce,
Hi Peter, I was wondering if I could pick your SCO brain please.
I am moving to NZ full time in November 2022.
Previoulsy I had a self contained camper but this time I am looking to get a proper 4X4 so I can get to all the places I could not in my camper.
My question is would I be able to get something like a Toyota Hilux Surf or Land Cruiser self contained? If I had the bed made in the back with all the sink and pluming, I would then remove the passenger seat and put the toilet there. Would this pass? Looking for ideas and thanks for any feedback.
Stuart
Hi, nice clear article ,much appreciated just a quick query, what fittings do I use to get from sink waste to be able to attach the flexible waste pipe. Again great work
Hey Jared!
This is a hard question to answer as I can’t see your sink however I will do my best.
My sink had a large screw fitting attached to it that must have been around 60mm in diameter. This came with the sink and included the grate to stop food going down the sink. You can buy these separate at Bunnings. This is the piece I am talking about – https://www.bunnings.co.nz/kinetic-sink-plug-waste-40mm_p0302920 That one is 40 mm but you need the right size for your sink.
Then in order to get my 18 mm hose to fit to it, I went to bunnings and went to the plumbing section that stocks all the black plastic fittings and just started connecting pieces that reduced the size until it fit. Pieces like this – https://www.bunnings.co.nz/rx-plastics-threaded-hex-nipple-25mm_p0897694 and this – https://www.bunnings.co.nz/rx-plastics-ltd-threaded-reducing-bush-20-x-15mm-black_p0890256 (examples only and not actual sizes.) There was no special piece with a hose connector. Instead, I just put the thread of the reduced piece inside the hose. The easiest way to do it is to take your hose and your sink fitting to Bunnings and start connecting pieces.
You can see in the first picture of the sink the black fittings and the hose connected with a hose clamp. I made that part with the fittings I found at bunnings.
I hope this helps but if not reach out again and I’ll try to explain it better!
Thanks
Daniel
Hi there! It has been a headache for sure trying to get my little trailer camper all self contained but I finally only have the plumbing to go! What sort of vent did you use for the fresh water? I have a hand pump tap so do I still need a vent? The self containment guy I spoke to didnt mention it so am confused once again lol also, are the hose clamps what you used to be able to take the containers in and out while still having them watertight? Thanks heaps for your help
Hey Shelly!
That awesome! You are almost there!
I got my vents from Burnsco. They are a retailer that sells these sorts of supplies. Here is the link to the product – https://www.burnsco.co.nz/shop/rv/water-container-vent-kit.To install the vent I just drilled a small hole in my plastic container and forced the vent through. It does come with a sharp plastic end to pierce through the plastic but it didn’t work so well.
Yes, they are hose clamps. It’s the best way to attach everything so you can remove them.
Hope this helps!
Thanks
Daniel
Hi there!
This is the most helpful blog iv read!! Thank you!
One question..we have a caravan we are wanting to self contain for my family of 5. We have a 40 litre fresh water tank plumbed into sink already but we need 60 litres. Can we put in another 20 litre container to store water but not plumbed in? Or do we need atleast 60 litres plumbed in? We have the grey water tank finally sorted but are scratching our heads at the easiest way to get the fresh water compliant. Any help greatly appreciated.
Thanks
Billie!
Hey Billie, That’s a great question!
The rules state you need to be able to live for 3 days without needing supplies. Technically you could do that the way you are saying with the extra tank. I think it will come down to the person certifying your van. However, my recommendation would be to have a second tank and then connect it to the 40-liter tank via a hose. That way you could argue that both tanks are connected so it is essentially a 60-liter tank.
Also, just remember you only need it to work while you get the certificate. After, you could just use the 40-liter tank and have a spare 20 liters on hand.
I hope this helps and good luck!
Thanks
Thanks for the blog. Am I correct in thinking that the vent pipe for the Grey water is supposed to start at the top of the grey water tank. Rise to a hight above the bottom of the sink then vent outside. In your case the pipe was bent back on its self and went outside via a convenient hole in your step? I think the point is that if the grey water tank is full water will not drain away from the sink, giving you a warning of over full. I’m just gathering the bits to start my conversion.
Hey Ian,
Yes, that’s correct. I do say this is the blog post but I may need to word it better. It says “This hose must travel higher than the waterline of the sink before exiting the vehicle”
My van did originally do that, however, I ended up moving it because it was not needed and that entire process is a lot of overkill for a setup with a hand-pumped sink. To get certified you do need it though.
Thanks
Daniel
Hi there – for the toilet is it 3L per person for 3 days? Looked in their PDF to say 1L per person per day so I’m confused?
Hey Cat,
Yes, the 3L is for 1 person for 3 days or 1L per person per day (for 3 days). The reason you need 3L is that to be considered self-contained you need to be able to live without services for 3 days straight. So if you are 2 people you need to have 6L in total for the 3 days.
Let me know if you need any more help
Thanks
Daniel
Hi Daniel. Great blog and very helpful thanks. I have a quick question about your mattress. Where did you get it from and would you recommend it? Thanks
Cheers man, this is very helpful cleared up a few things for me 🙂
Possible the best explanation about NZ plumbing in a van .. helps me a lot thank you mate , well done
Hi Daniel!
Great info here thanks, just wondering how long it typically takes to get the certificate?
Thanks
Hey Kay,
The actual check on the vehicle takes only 30 minutes.
Thanks
Daniel